A while ago, I stumbled upon this thread on Haunt Forum, on how to make a dragon skull from a plastic bottle. I wanted to make one for Halloween, but I didn't have any time left. In April, there's another edition of Fantasy Fair in Holland, and my costume will include a skull-topped staff. More on the staff later, now I'm gonna make me a dragon skull!
Materials
- Empty soda bottle, I used a 2 liter bottle
- Newspaper
- Glue
- Clay
- Sculpting tools
- Aluminium foil
- Gesso
- Acrylic paint
- Matte varnish
The basic shape
I started by cutting the shape of the upper jaw from the bottle. You can use the rest of the bottle for the lower jaw, I only needed the upper part. One piece of advice, be careful as hell! Especially the bottom was hard to cut, and I still have a scar on my arm from a box cutter accident when I was 12. Perhaps I'll tell the story behind this some other time, but not now. When all goes well, you end up with something that will eventually become a dragon skull, hopefully without horrible fleshwounds. I also gave it two eye sockets and nose holes.


The bottle is quite flimsy and flexible, and clay doesn't really adhere well to it. It needs something to make it more rigid and a good base for the clay. In the original tutorial, the creator coated it with monster mud. I'm not really a fan of this stuff. I used it a lot for my Halloween props last year, and it's messy and fragile. So I went for another solution: paper maché! I coated the entire thing with glued strips of newspaper. A single layer won't do much, of course, but multiple layers create a rigid, cardboard-like shell.
I started by cutting the shape of the upper jaw from the bottle. You can use the rest of the bottle for the lower jaw, I only needed the upper part. One piece of advice, be careful as hell! Especially the bottom was hard to cut, and I still have a scar on my arm from a box cutter accident when I was 12. Perhaps I'll tell the story behind this some other time, but not now. When all goes well, you end up with something that will eventually become a dragon skull, hopefully without horrible fleshwounds. I also gave it two eye sockets and nose holes.
The bottle is quite flimsy and flexible, and clay doesn't really adhere well to it. It needs something to make it more rigid and a good base for the clay. In the original tutorial, the creator coated it with monster mud. I'm not really a fan of this stuff. I used it a lot for my Halloween props last year, and it's messy and fragile. So I went for another solution: paper maché! I coated the entire thing with glued strips of newspaper. A single layer won't do much, of course, but multiple layers create a rigid, cardboard-like shell.
Funny anecdote about this! I posted a picture of my work in progress on my Facebook page. I used the newsletter from my health insurance company for the paper maché shell, and a headline on one of the pages said "Mijn laatste tetanusspuit", wich means "My last tetanus shot". Ripping it into strips turned the text into something else. As you can see on the photo, it says "Mijn laatste tet", meaning, literally, "My last boob"! Didn't notice it until someone pointed it out.

Sculpting details
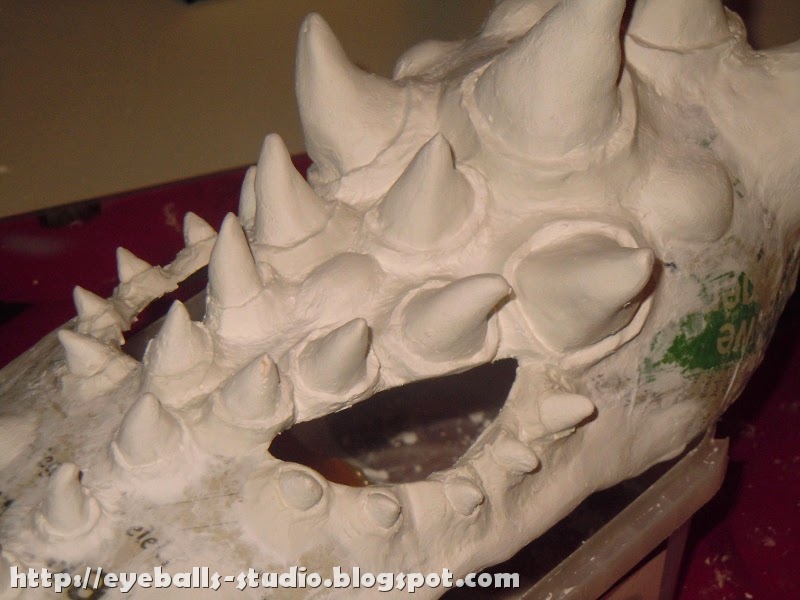
When the paper maché had dried enough, it was time to start sculpting! A dragon skull needs lots of spikes. These are very easy to make, and the clay sticks very well to the paper. The horns were a bit more difficult. I started by making two long spikes from aluminium foil, and wrapping them in paper maché. I kept the shell thin on purpose, so they would remain flexible. I attached them to the skull, and then wrapped them in clay. I think they turned out pretty great!


A dragon also needs teeth, of course! This was more or less the same as the spikes. When I was done with them, I added some more details to the spikes. I made small ridges around the base of the spikes, so they seem to protrude from the skull rather than being a seamless part of it.

When the paper maché had dried enough, it was time to start sculpting! A dragon skull needs lots of spikes. These are very easy to make, and the clay sticks very well to the paper. The horns were a bit more difficult. I started by making two long spikes from aluminium foil, and wrapping them in paper maché. I kept the shell thin on purpose, so they would remain flexible. I attached them to the skull, and then wrapped them in clay. I think they turned out pretty great!
A dragon also needs teeth, of course! This was more or less the same as the spikes. When I was done with them, I added some more details to the spikes. I made small ridges around the base of the spikes, so they seem to protrude from the skull rather than being a seamless part of it.
Painting
Time to start painting! The skull first got a few layers of gesso. If you don't know what this is, it's some sort of primer. Besides giving it a bright white base color, it also strengthened the entire sculpture a bit and prevents the clay from cracking and chipping. After that, I used diluted yellow ochre to give the horns, spikes and teeth an aged, yellowish color. The skull itself got the same treatment, only a bit lighter. I repeated the process on the horns with diluted burnt umber. Finally, the entire skull got a layer of varnish.


This skull is already a cool prop on its own, but I'm gonna use it to make a skull-topped warlock staff. But that's for next time!


0 reacties:
Een reactie posten